If you are starting your coding journey, learning how to install java is one of the most important first steps you will ever take. Java powers billions of devices, runs massive enterprise systems, drives Android apps, and is still one of the most loved languages in 2026. But before you write a single line of code, you need a working Java setup on your computer. This guide will walk you through every step, every tool, and every fix, so your installation works perfectly on the first try.
This article is written for true beginners. You do not need any prior programming knowledge. By the end, you will know how to install java on Windows, macOS, and Linux, how to configure environment variables, how to verify your setup in the terminal, and how to fix common errors. Let us begin your journey into the world of Java.
What You Need Before Installing Java
Before learning how to install java, it helps to understand what you are actually installing. Java is not a single program. It is a complete development environment made up of several parts. The two most important are the JDK and the JRE.
The JDK, or Java Development Kit, is what developers use to write, compile, and run Java programs. It includes the compiler, runtime library files, developer binaries, and tools for debugging. The JRE, or Java Runtime Environment, only runs Java programs but cannot compile them. For learning and building projects, you always want the JDK.
You will also choose between Oracle JDK vs OpenJDK. Both are excellent. Oracle JDK is the official commercial version. OpenJDK is the free open source version maintained by the community. For most learners, OpenJDK is more than enough, and it is completely free for any use.
A Short History of Java Setup (1995 – 2026)
Java was first released in 1995 by Sun Microsystems, and back then installation was a complicated process involving manual downloads, zip files, and tricky environment variable setup. Over the years, Oracle and the OpenJDK community have made installation much easier. Today, you can install Java in just a few minutes with modern installers, package managers, and cross platform software configuration tools.
If you want to explore where it all began, this java history: 1991 to today journey is a fascinating read. It shows how Java grew from a small experimental language called Oak into the global powerhouse that runs much of the modern internet, fintech systems, and Android devices.
How to Install Java on Windows 11
Installing Java on Windows 11 is straightforward. Follow these steps carefully and your setup will be ready in minutes.
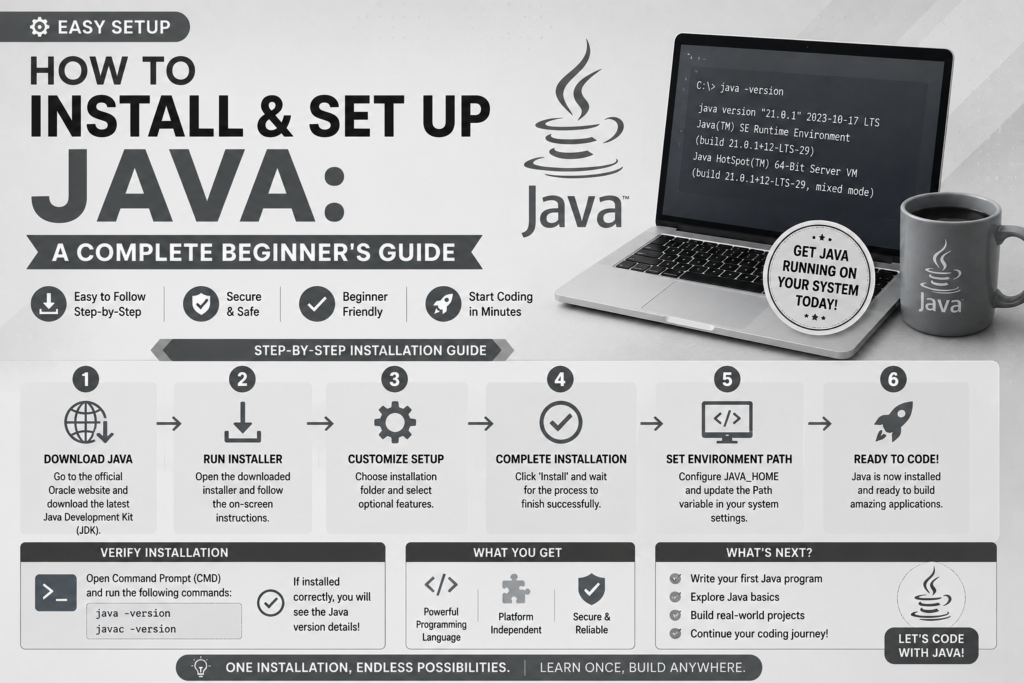
Step 1. Download the JDK. Visit the official Oracle website or adoptium.net for OpenJDK. Choose the latest Long Term Support version, such as JDK 21 or the newest LTS available in 2026. Pick the Windows x64 Installer.
Step 2. Run the installer. Double click the downloaded file, accept the license, and follow the prompts. The default installation directory is usually:
makefileCopy codeC:\Program Files\Java\jdk-21
Step 3. Configure Java environment variables. This is the most important part of how to install java correctly.
- Open the Start menu and search for Environment Variables
- Click Edit the system environment variables
- Click Environment Variables
- Under System variables, click New and add:
yamlCopy codeVariable name: JAVA_HOME
Variable value: C:\Program Files\Java\jdk-21
- Then find the Path variable, click Edit, and add:
pythonRun CodeCopy code%JAVA_HOME%\bin
This setup Java home path step tells Windows where Java lives so you can use it from any folder.
Step 4. Verify Java terminal installation. Open Command Prompt or PowerShell and type:
textCopy codejava -version
javac -version
If you see version numbers, congratulations. You now know how to install java successfully on Windows 11.
How to Install Java on macOS
Installing Java on macOS is even easier, especially with Homebrew. If you do not have Homebrew, install it first from brew.sh. Then run these commands in Terminal:
cssCopy codebrew install openjdk@21
After installation, you need to link Java so your system can find it:
bashCopy codesudo ln -sfn /opt/homebrew/opt/openjdk@21/libexec/openjdk.jdk /Library/Java/JavaVirtualMachines/openjdk-21.jdk
Next, configure the path variable string in your shell profile. If you use zsh, open the configuration profile scripts:
bashCopy codenano ~/.zshrc
Add these lines:
bashCopy codeexport JAVA_HOME=$(/usr/libexec/java_home -v 21)
export PATH=$JAVA_HOME/bin:$PATH
Save and reload:
bashCopy codesource ~/.zshrc
Verify your installation:
textCopy codejava -version
That is how to install java on macOS using a clean, modern method. You can also download the official .dmg installer from Oracle if you prefer a graphical experience.
How to Install Java on Linux
Linux users have the easiest experience because Java is available in almost every package manager. For Ubuntu or Debian based systems, run:
sqlCopy codesudo apt update
sudo apt install openjdk-21-jdk
For Fedora:
textCopy codesudo dnf install java-21-openjdk-devel
For Arch Linux:
textCopy codesudo pacman -S jdk-openjdk
After installation, verify with:
textCopy codejava -version
javac -version
To configure Java environment variables on Linux, edit your shell file:
bashCopy codenano ~/.bashrc
Add:
bashCopy codeexport JAVA_HOME=/usr/lib/jvm/java-21-openjdk
export PATH=$JAVA_HOME/bin:$PATH
Apply the changes:
bashCopy codesource ~/.bashrc
This completes the cross platform software configuration. You now know how to install java on the three major operating systems.
How to Configure JVM and Environment Variables
The JVM, or Java Virtual Machine, is the engine that runs your Java programs through the bytecode execution model. When you compile a .java file, it becomes a .class file containing bytecode. The JVM then executes that bytecode on any device.
To make sure your JVM works smoothly, your environmental path configuration must point to the correct Java installation directory. If you ever install multiple versions of Java, you can switch between them by updating JAVA_HOME.
On Linux and macOS, you can check available versions with:
bashCopy code/usr/libexec/java_home -V
On Windows, you can simply change the JAVA_HOME variable to a different JDK folder. This flexibility is one reason developers love Java for future of software engineering projects that often require multiple runtime versions.
Writing Your First Java Program
Now that your setup is complete, let us test it with a simple program. Create a new file called HelloWorld.java and paste this code:
javaRun CodeCopy codepublic class HelloWorld {
    public static void main(String[] args) {
        System.out.println("Hello, Java World!");
    }
}
Open your terminal in the folder where you saved the file and run:
textCopy codejavac HelloWorld.java
java HelloWorld
You should see:
textCopy codeHello, Java World!
This tiny program demonstrates the full source code compilation process. The javac command compiles your code into bytecode, and the java command runs it on the JVM. If this works, your environment is fully ready.
Common Java Installation Troubleshooting
Even with a clean guide, things can go wrong. Here are the most common issues developers face when learning how to install java, and how to fix them quickly.
Problem 1. Java command not found. This usually means your path variable string is not set. Recheck JAVA_HOME and make sure %JAVA_HOME%\bin or $JAVA_HOME/bin is added to your PATH.
Problem 2. javac is not recognized. You may have installed only the JRE. Reinstall the JDK to get the compiler.
Problem 3. Wrong Java version showing. You may have multiple Java installations. Update JAVA_HOME to point to the correct installation directory.
Problem 4. Permission denied on macOS or Linux. Use sudo when needed, or check folder ownership with chown.
Problem 5. Installer fails on Windows. Run the installer as administrator and disable any aggressive antivirus temporarily.
These small fixes solve almost every Java installation troubleshooting case you will encounter as a beginner.
Choosing Between Oracle JDK and OpenJDK
Many beginners wonder which Java distribution to choose. Both Oracle JDK and OpenJDK use the same source code base, so the core experience is identical. The differences are mostly in licensing, support, and small performance tweaks.
OpenJDK is free, open source, and perfect for learning, personal projects, and most commercial work. Distributions like Eclipse Temurin, Amazon Corretto, and Microsoft Build of OpenJDK are excellent choices. Oracle JDK offers paid commercial support, which is useful for large enterprises.
For beginners learning how to install java, OpenJDK from Adoptium Temurin is the safest, most flexible option. It works across all platforms and is widely used in production.
Picking a Code Editor or IDE
Once you have Java installed, you need a place to write code. Beginners can use:
- IntelliJ IDEA Community Edition, the most popular Java IDE
- Eclipse IDE, a classic free option
- Visual Studio Code with the Java Extension Pack
- NetBeans, great for learning and Swing apps
IntelliJ IDEA is the recommended starting point. It is powerful, beautiful, and offers smart suggestions that help beginners learn faster. If you want to explore modern coding workflows, the best free ai tools can also help you write, debug, and explain Java code while you learn.
Understanding the Java Execution Environment
When you run a Java program, several things happen in the execution environment. Your source code goes through the source code compilation process, becomes bytecode, and runs on the JVM. The JVM uses the command prompt utility or your IDE to execute everything safely.
Java is famous for its write once, run anywhere promise. That is possible because the JVM acts as a translator between your code and the operating system. This is one of the reasons Java remains a top choice for enterprise systems, banking platforms, and Android development even after three decades.
If you are curious about what comes next in Java, this future of java & what’s coming preview shows how the language continues to evolve with features like virtual threads, pattern matching, and improved performance.
What to Learn After Installing Java
Once your Java environment is ready, the real fun begins. Here is a smart learning path for beginners:
- Variables, data types, and operators
- Control flow with if, else, switch, and loops
- Functions and methods
- Object oriented programming concepts like classes, inheritance, and polymorphism
- Collections such as ArrayList and HashMap
- Exception handling with try, catch, and finally
- File handling and input output streams
- Building small projects like calculators, to do apps, and quiz games
You can deepen your skills with this java syntax & data types guide which explains primitives, references, and how Java stores information in memory.
After mastering the basics, you can also explore java oop concepts explained which is the heart of professional Java development. OOP is what allows Java to scale into massive systems used by Netflix, Amazon, and global banks.
Tips to Make Your Java Setup Easier
Here are honest, practical tips that will save you hours of frustration.
- Always install the latest LTS version, not the newest experimental release
- Use a package manager like Homebrew, apt, or Chocolatey when possible
- Keep only one active JDK in your PATH to avoid version conflicts
- Restart your terminal after changing environment variables
- Write a tiny Hello World after every major change to confirm everything still works
- Use IntelliJ IDEA to avoid manual compilation while learning
These small habits make how to install java feel effortless and prevent the small errors that frustrate beginners.
Frequeently Asked Questions (FAQs)
Is Java free to install and use?
Yes. OpenJDK is completely free for personal, educational, and most commercial uses. Oracle JDK is also free for development and testing, but commercial production use may require a license.
Do I need both JDK and JRE?
No. The JDK already includes the JRE. If you install the JDK, you can both write and run Java programs. The JRE alone only runs Java applications.
What is the difference between JDK and JRE?
The JDK is for developers and includes the compiler, debugger, and tools. The JRE only runs Java programs and does not include development tools. Beginners should always install the JDK.
Why does my computer say Java is not recognized?
This usually means your environment variables are not set correctly. Double check JAVA_HOME and make sure the bin folder is added to your PATH.
How do I uninstall Java?
On Windows, use the Apps section in Settings. On macOS, remove the JDK folder from /Library/Java/JavaVirtualMachines. On Linux, use your package manager such as apt remove or dnf remove.
Can I install multiple Java versions?
Yes. Many developers keep multiple JDKs and switch between them by updating JAVA_HOME. Tools like SDKMAN make this very easy on macOS and Linux.
Conclusion
Learning how to install java is the first real step into becoming a confident developer in 2026. With the right setup, you unlock a world of opportunities, from Android apps to enterprise backend systems, from cloud platforms to fintech tools. Java is stable, powerful, and respected, and once your environment is configured, the rest of your journey becomes much easier.
Take your time, follow the steps carefully, and verify each part of your installation. If something breaks, the troubleshooting section above will guide you. Once your terminal proudly shows your Java version, you are officially ready to write your first programs, build small projects, and grow into a skilled developer. Your Java journey starts now, and the future is bright.